Fedora Self–Hosted Server
Manage from Mac
Now that Brew is installed on either your personal Mac or another Mac in the same network, let’s install Lima (Linux Machines) with the goal of firing up a Fedora Cloud instance and further learn more about what Fedora has to offer as a self hosted edge services platform.
Lima is sponsored by Cloud Native Computing Foundation (CNCF). This means Lima is seen as a useful tool for cloud computing even though it is basically designed to run locally on MacOS.
Continue reading "Getting started with Lima (Linux Machines)"
$ limactl create
The shell will return a small TUI to help you create your first virtual machine
? Creating an instance "default"  [Use arrows to move, type to filter]
> Proceed with the current configuration
  Open an editor to review or modify the current configuration
  Choose another template (docker, podman, archlinux, fedora, ...)
  Exit
Navigate the > to Choose another template... and press Return. A list will appear. Using the Down-Arrow key navigate to fedora and press **Return ** again
? Choose a template f  [Use arrows to move, type to filter]
  apptainer-rootful
  default
  docker-rootful
  experimental/virtiofs-linux
  faasd
> fedora

# After selecting "fedora", press reurn again to proceed with the install
> Proceed with the current configuration
  Open an editor to review or modify the current configuration
  Choose another template (docker, podman, archlinux, fedora, ...)
  Exit
When the installation process is finished Lima will print the command to get into the VM’s shell: As the install is from a frozen cloud image the first thing I do in the shell is run an update.
Note: if this is the only Lima instance, just entering Lima will put the terminal in the shell otherwise the command limactl shell [vm-instance-name]. If you forget the name of the instance just enter limactl list
INFO[0066] Run `limactl start default` to start the instance.
INFO[0076] READY. Run `lima` to open the shell.
$  lima
[user@computera-vm-instance]:[~/]$pwd
$ ~/
$ sudo dnf update --refresh
Fedora 39 - aarch64                                                                                                          6.0 kB/s |  16 kB     00:02
Fedora 39 openh264 (From Cisco) - aarch64                                                                                    829  B/s | 990  B     00:01
Fedora 39 - aarch64 - Updates                                                                                                 11 kB/s |  14 kB     00:01
Dependencies resolved.
======================================================================================
 Package                  Architecture              Version                    Repository                 Size
======================================================================================
Installing:
 kernel-core              aarch64                   6.6.7-200.fc39  updates      19 M
Upgrading:
 NetworkManager           aarch64                   1:1.44.2-1.fc39 updates      2.0 M
 NetworkManager-libnm     aarch64                   1:1.44.2-1.fc39 updates      1.8 M
… [skipping till the end]

Transaction Summary
======================================================================================
Install    6 Packages
Upgrade  149 Packages

Total download size: 240 M
Is this ok [y/N]: y
This upgraded 155 packages including the kernel, so at the end I restart the VM. I have learned through experimentation that a reboot command will not update the active kernal to the new one. Instead just exit the shell and shut down/restart the VM.
$ [user@computera-vm-instance]:[~/]$exit
$ limactl stop fedora-39-de
$ limactl list

NAME     	  STATUS   SSH             VMTYPE ARCH     CPUS MEMORY DISK   DIR
fedora-39-de. Stopped  127.0.0.1:60022 qemu   aarch64  4    4GiB   100GiB /Path/to/VM
$ limactl start fedora-39-de
Neofetch is a command-line system information tool written in bash 3.2+. Neofetch displays information about your operating system, software and hardware in an aesthetic and visually pleasing way.
$ sudo dnf install neofetch
$ neofetch

$ neofetch
             .',;::::;,'.                mac2net@lima-default
         .';:cccccccccccc:;,.            --------------------
      .;cccccccccccccccccccccc;.         OS: Fedora Linux 39 (Cloud Edition) aarch64
    .:cccccccccccccccccccccccccc:.       Host: QEMU Virtual Machine virt-8.2
  .;ccccccccccccc;.:dddl:.;ccccccc;.     Kernel: 6.6.7-200.fc39.aarch64
 .:ccccccccccccc;OWMKOOXMWd;ccccccc:.    Uptime: 44 mins
.:ccccccccccccc;KMMc;cc;xMMc:ccccccc:.   Packages: 660 (rpm)
,cccccccccccccc;MMM.;cc;;WW::cccccccc,   Shell: bash 5.2.21
:cccccccccccccc;MMM.;cccccccccccccccc:   Resolution: 1280x800
:ccccccc;oxOOOo;MMM0OOk.;cccccccccccc:   Terminal: /dev/pts/0
cccccc:0MMKxdd:;MMMkddc.;cccccccccccc;   CPU: (4)
ccccc:XM0';cccc;MMM.;cccccccccccccccc'   GPU: 00:04.0 Red Hat, Inc. Virtio 1.0 GPU
ccccc;MMo;ccccc;MMW.;ccccccccccccccc;    Memory: 239MiB / 3896MiB
ccccc;0MNc.ccc.xMMd:ccccccccccccccc;
cccccc;dNMWXXXWM0::cccccccccccccc:,
cccccccc;.:odl:.;cccccccccccccc:,.
:cccccccccccccccccccccccccccc:'.
.:cccccccccccccccccccccc:;,..
  '::cccccccccccccc::;,.
Here’s the colour image…

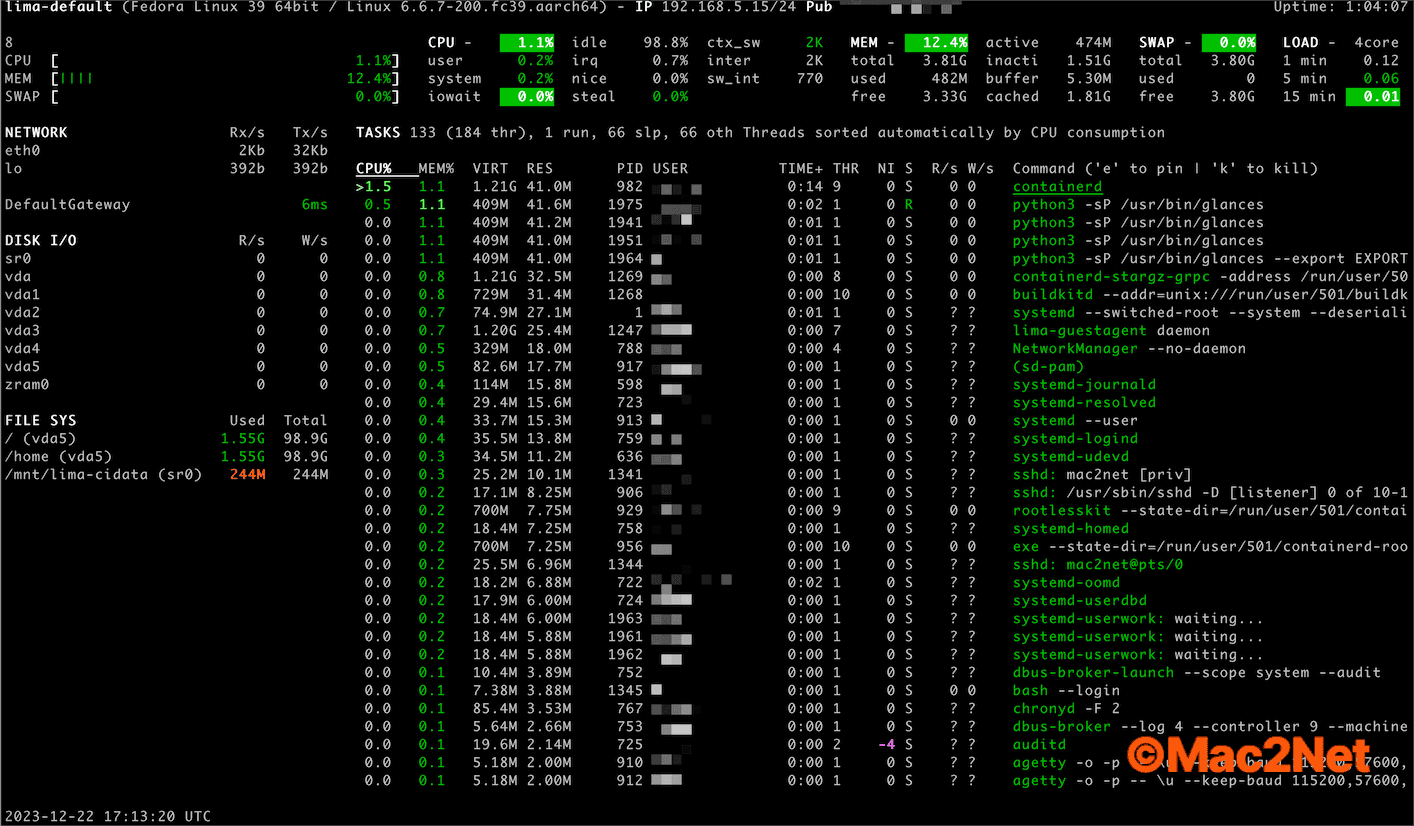
Glances is a cross-platform system monitoring tool written in Python.
$ sudo dnf install glances
$ glances
From this point I can install any package in the standard Fedora release repositories as well as all the available Fedora group packages. Entering dnf grouplist --hidden will tell the VM to query the Fedora repositories and list all the current packages available.
You wouldn’t have it any other way! In a contradictory fashion, the developers have produced an install of Lima that requires a bit of fiddling to customise. Linux comes with over 40 templates in YAML format which are easy to read and modify. But they are stored in a hidden folder. In addition, the virtual machines themselves, which can easily become bigger than 2 gigabytes, while stored in a different location than the templates, are also in a hidden folder. Any modifications to templates or additions made to the templates folder will be wiped out every time Lima is updated through Brew.
On an ARM64 Mac, Lima templates are stores at:
/opt/homebrew/Cellar/lima/0.19.0/share/lima/templates
But I just ran a Brew upgrade and when it finishes Lima will be at a new location:
/opt/homebrew/Cellar/lima/0.19.1/share/lima/templates
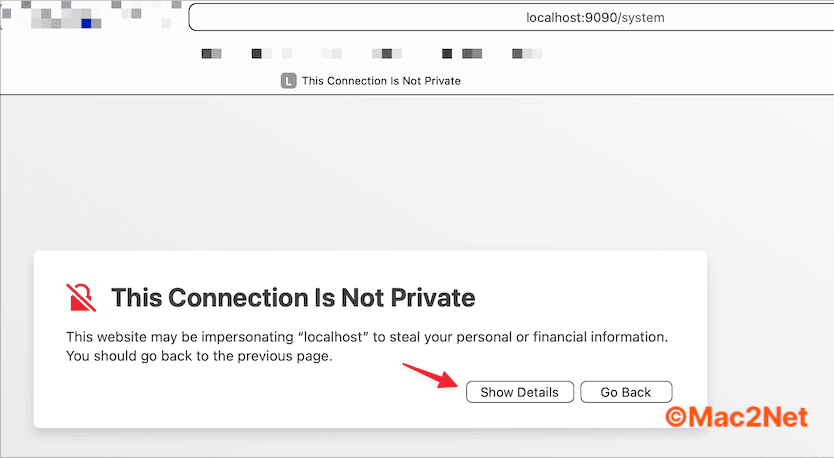
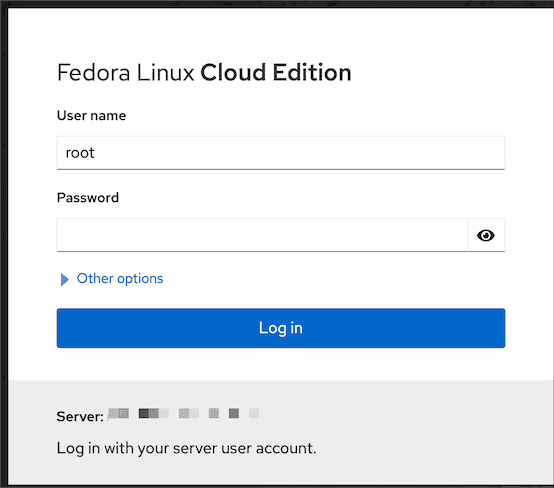
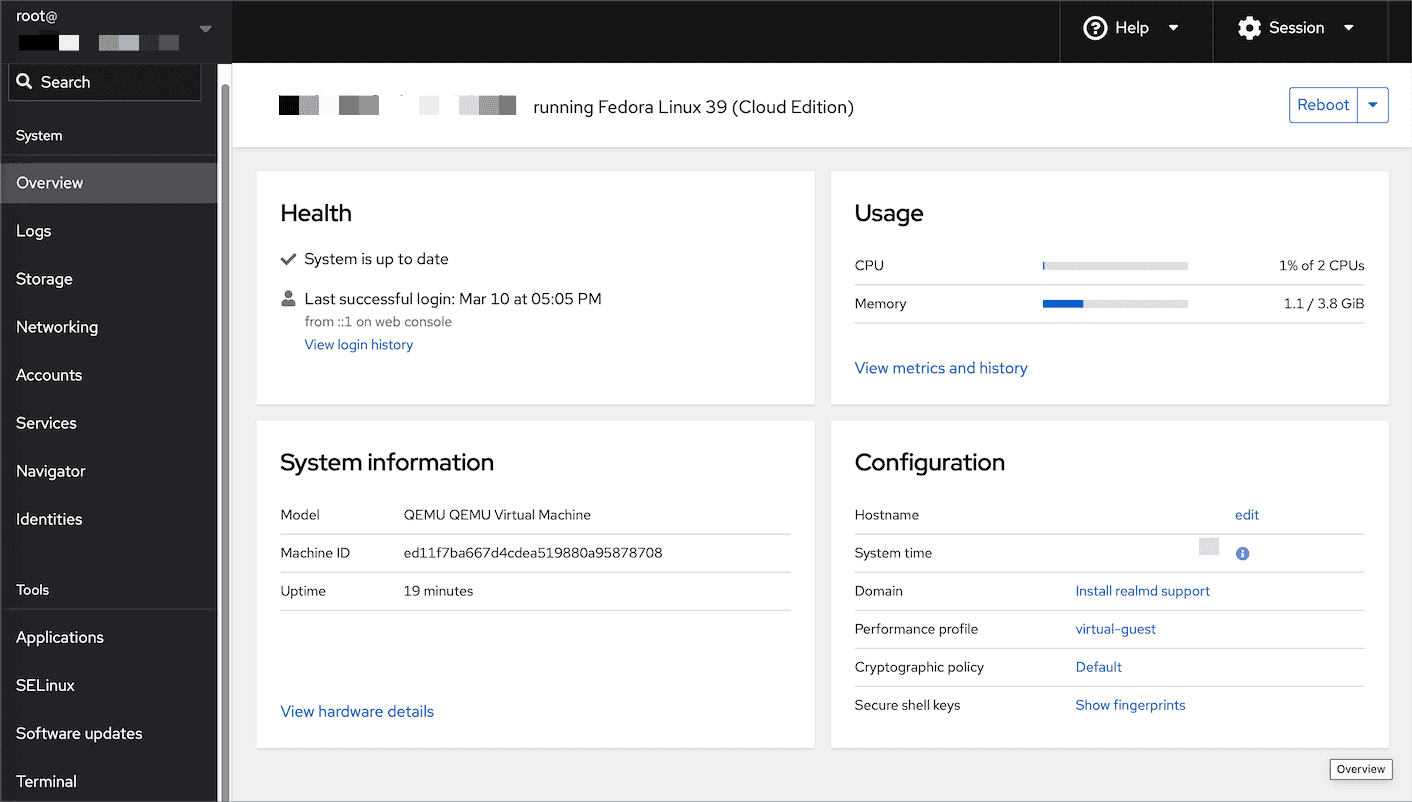
Once the VM has been installed and executed the bash scripts, it is time to fire up Cockpit.
Note While a Lima-based Cockpit is accessed via port 9090, in an ideal world any and all Cockpits configured on your server whether they be on the metal or in a VM should be accessed via SSH - usually on port 22.
In addition Lima does not allow a public accessible IPv6 address. If you are trying to reach your IPv6 SHES server from a remote location, you will either need to have a computer running Linux with Cockpit on the metal or in a VM (like a MBA) OR use a VNC client app that allows you to connect to a remote VNC server via SSH assuming the server has an open port 22 and an accessible IPv6 address.
In addition Lima does not allow a public accessible IPv6 address. If you are trying to reach your IPv6 SHES server from a remote location, you will either need to have a computer running Linux with Cockpit on the metal or in a VM (like a MBA) OR use a VNC client app that allows you to connect to a remote VNC server via SSH assuming the server has an open port 22 and an accessible IPv6 address.
In addition Lima does not allow a public accessible IPv6 address. If you are trying to reach your IPv6 SHES server from a remote location, you will either need to have a computer running Linux with Cockpit on the metal or in a VM (like a MBA) OR use a VNC client app that allows you to connect to a remote VNC server via SSH assuming the server has an open port 22 and an accessible IPv6 address.
To access Cockpit running on the Mac you are using without bridge mode point your browser to https://locahost. Or – in bridge mode – https://local-ip-address. If you are intending to access Cockpit on another local Mac which is in bridged mode that you presumably are connected to via SSH, enter the VM’s shell and enter the ip address command to retrieve the IP address as follows:
$ ssh user@vm-host
vm-host $limactl shell vm-name
vm-host vm-name $ ip address show lima0
Because

Upload another bash script to install more utilities.
#!/bin/bash
dnf -y install bpytop
dnf -y install bandwhich
dnf -y install ranger
dnf -y install hdparm
dnf -y install mc
dnf -y install ncdu
dnf -y install grsync
dnf -y install blivet-gui
dnf -y install btop
dnf -y install nmap
dnf -y install wget
dnf -y install lshw
dnf -y install borgmatic
Download the session
Full text
#!/bin/bash
dnf -y install bpytop
dnf -y install bandwhich
dnf -y install ranger
dnf -y install hdparm
Here
dnf -y install bpytop dnf -y install bandwhich dnf -y install ranger dnf -y install hdparm dnf -y install mc dnf -y install ncdu dnf -y install grsync dnf -y install blivet-gui dnf -y install btop dnf -y install nmap dnf -y install wget dnf -y install lshw dnf -y install borgmatic dnf -y groupinstall Editors dnf -y install switchdesk switchdesk-gui dnf -y install duf dnf -y install btrfs-assistant dnf -y install vorta dnf -y install NetworkManager-tui dnf -y install gnome-system-monitor dnf -y install gnome-disk-utility dnf -y install tuned systemctl start tuned systemctl enable tuned dnf -y install deja-dup dnf -y install bash-color-prompt dnf -y groupinstall "LXQt" dnf -y groupinstall "Applications for the LXQt Desktop" More examples
Uploading is simple with Cockpit.
BTW many (but not all) of these utilities can also be installed directly in MacOS with are old friend Brew. Let’s look up ncdu on Brew. First of all what is ncdu? Just ask The Fedora…
$ dnf info ncdu
Last metadata expiration check: 1:04:30 ago on Mon 11 Mar 2024 06:04:02 AM CET.
Installed Packages
Name         : ncdu
Version      : 1.19
Release      : 1.fc39
Architecture : x86_64
Size         : 111 k
Source       : ncdu-1.19-1.fc39.src.rpm
Repository   : @System
From repo    : fedora
Summary      : Text-based disk usage viewer
URL          : https://dev.yorhel.nl/ncdu/
License      : MIT
Description  : ncdu (NCurses Disk Usage) is a curses-based version of the well-known 'du',
             : and provides a fast way to see what directories are using your disk space.
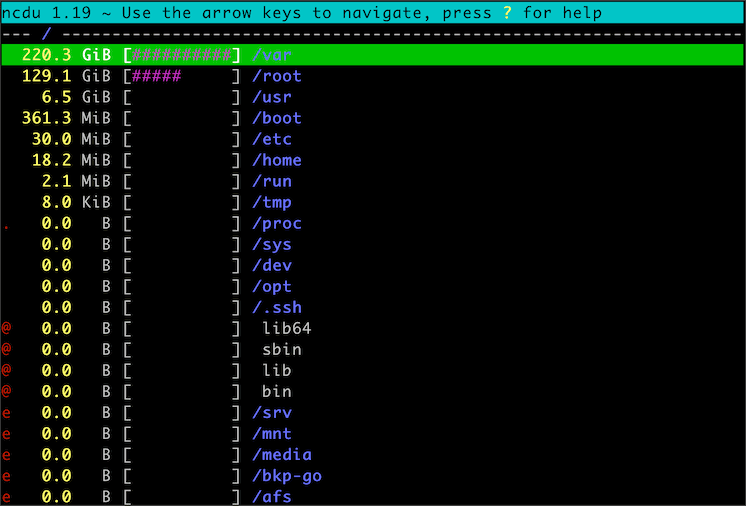
Here it is at work…
ncdu 1.19 ~ Use the arrow keys to navigate, press ? for help
--- / --------------------------------------------------------------------
  220.3 GiB [##########] /var
  129.1 GiB [#####     ] /root
    6.5 GiB [          ] /usr
  361.3 MiB [          ] /boot
   30.0 MiB [          ] /etc
   18.2 MiB [          ] /home
    2.1 MiB [          ] /run
    8.0 KiB [          ] /tmp
.   0.0   B [          ] /proc
    0.0   B [          ] /sys
    0.0   B [          ] /dev
    0.0   B [          ] /opt
    0.0   B [          ] /.ssh
@   0.0   B [          ]  lib64
@   0.0   B [          ]  sbin
@   0.0   B [          ]  lib
@   0.0   B [          ]  bin
e   0.0   B [          ] /srv
e   0.0   B [          ] /mnt
e   0.0   B [          ] /media
e   0.0   B [          ] /bkp-go
e   0.0   B [          ] /afs
*Total disk usage: 356.3 GiB   Apparent size: 128.4 TiB   Items: 809668
This is an image of the screen
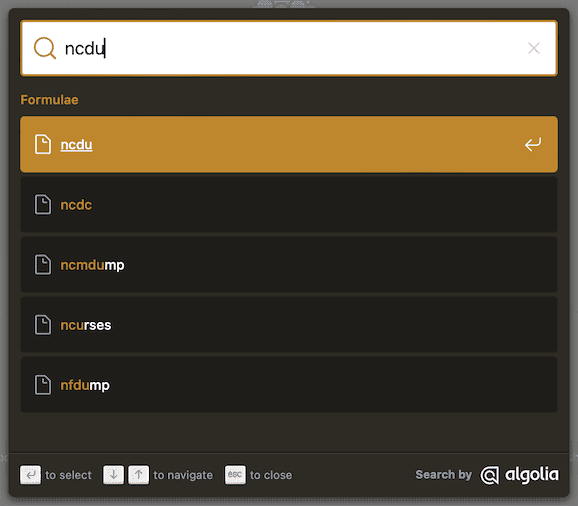
As a result of the apex powers at Apple, ncduwould actually be a useful utility for the Mac. Let’s go to https://brew.io and see if it is available and how to install it. Enter ncdu in Brew’s Search box.
Brew will respond with a list of packages that match the search criteria. Click on it ncdu
Brew will provide all the information required to get started with installing and using ncdu.
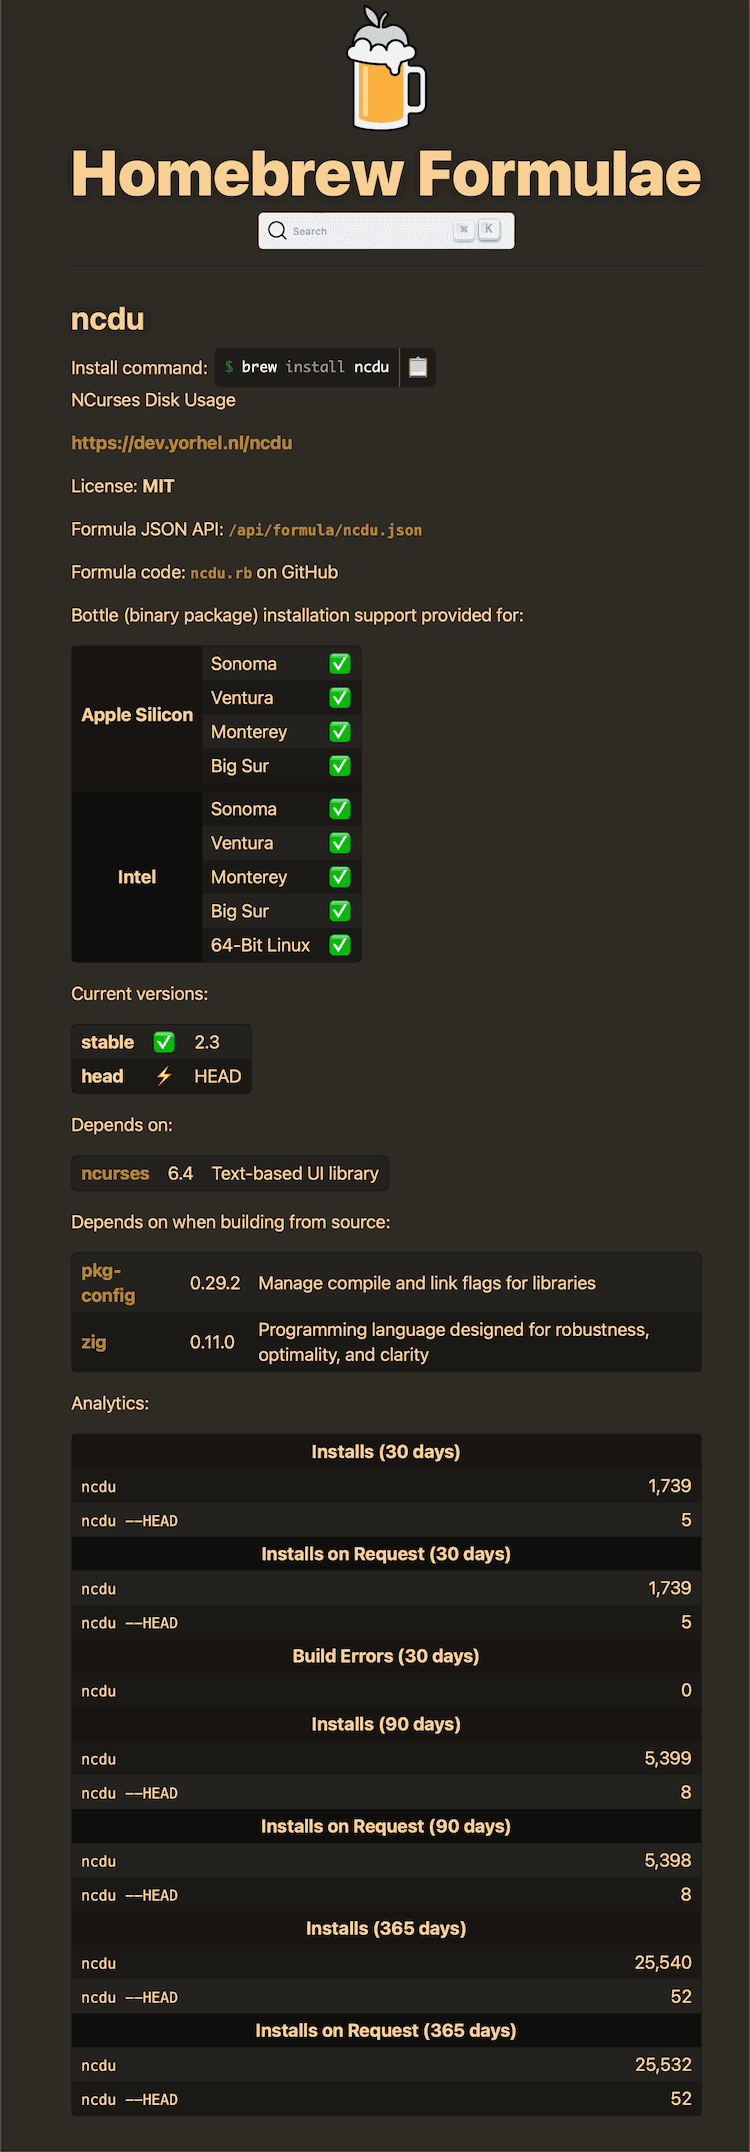
Let’s go ahead and install it on the Mac and give it a try…
$ brew install ncdu
==> Downloading https://ghcr.io/v2/homebrew/core/ncdu/manifests/2.3
==> Fetching ncdu
==> Downloading https://ghcr.io/v2/homebrew/core/ncdu/blobs/sha256:7c17a54a1c133f106b8ccc577241b977d76de394568b838107c5c397291b6759
###################################################################################################################################### 100.0%
==> Installing ncdu
==> Pouring ncdu--2.3.arm64_sonoma.bottle.tar.gz
🍺  /opt/homebrew/Cellar/ncdu/2.3: 6 files, 574.0KB
==> Running `brew cleanup ncdu`...
Disable this behaviour by setting HOMEBREW_NO_INSTALL_CLEANUP.
Hide these hints with HOMEBREW_NO_ENV_HINTS (see `man brew`).

# Get the sizes of the contents of the Documnts Folder:
$ ncdu ~/Documents
rpm --import -vv /etc/pki/rpm-gpg/RPM-GPG-KEY-redhat-*